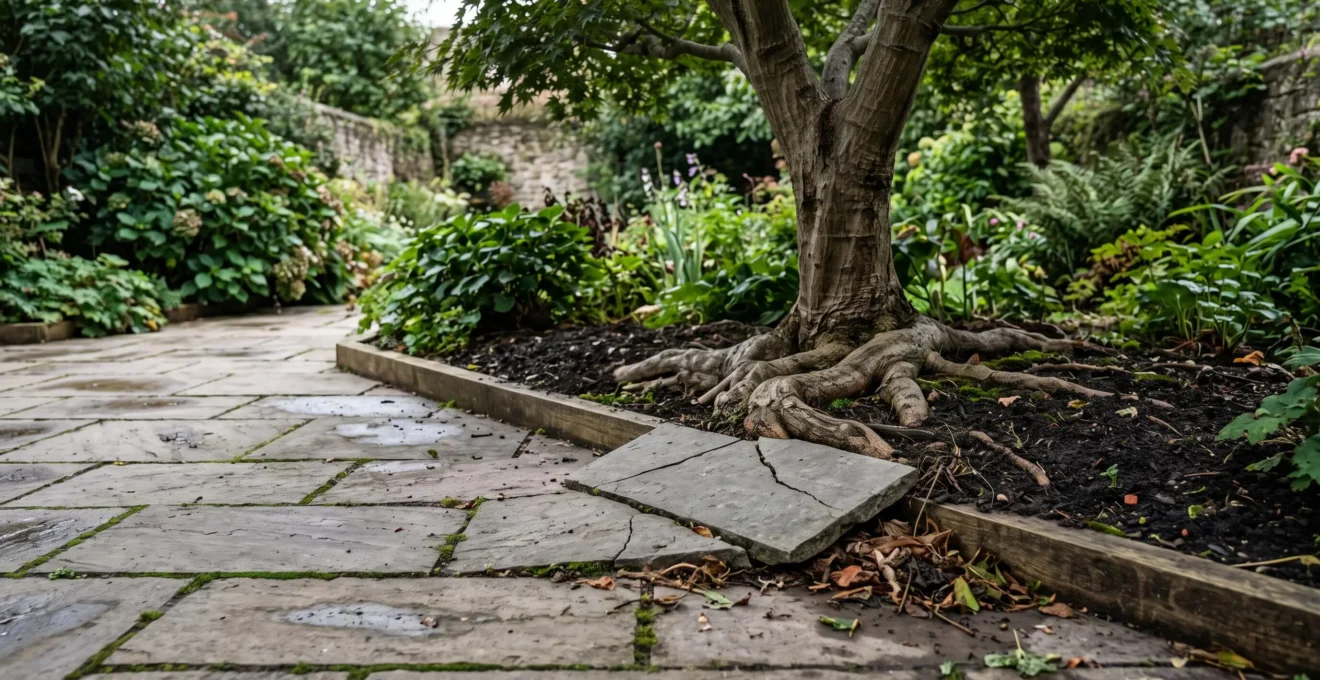
A garden can look beautifully balanced on completion yet develop expensive conflicts between its paving and planting within a few growing seasons. Tree roots lift slabs, rainwater collects against borders, and vigorous perennials spread across paths that were supposed to require little attention.
The solution is to design hard landscaping and soft landscaping as one connected system. Patios, paths, retaining walls and edging must accommodate drainage, soil movement, mature plant growth and routine maintenance. Planting should soften permanent structures without undermining their foundations or obstructing access.
For UK homeowners, the interaction becomes particularly important where clay soils, persistent winter moisture and established trees influence construction. A successful design considers what happens beneath the surface as carefully as what appears above it.
Before choosing paving colours or border plants, establish how water will move, where roots can develop and which areas must remain accessible. These early decisions determine whether the finished garden becomes easier to maintain or creates recurring repairs.
How to prevent hardscape and planting conflicts
- Plan drainage, finished levels and mature tree positions before installing permanent paving.
- Separate planting soil from structural foundations and detail edges to control runoff, soil movement and vegetation.
- Build and protect hard landscaping first where practical, restore construction-affected soil, then complete planting.
- Why Do Patios and Paths Crack Within 5 Years When Planted Too Close to Trees?
- How to Detail the Junction Between Paved Areas and Planted Beds to Avoid Waterlogging?
- Permeable Paving vs Traditional Slabs: Which Suits UK Rain Patterns and Planting Proximity?
- The Planting Mistake That Turns Low-Maintenance Patios Into High-Maintenance Weed Traps
- Should You Install Hardscapes Before or After Planting for Least Disruption?
- In What Order Should You Make Design Decisions to Avoid Costly Garden Redesigns?
- The Foundation Error That Causes Garden Paths to Fail Before Their Second Winter
- How Do Stone or Wood Garden Features Create Year-Round Structure When Plants Die Back?
Why Do Patios and Paths Crack Within 5 Years When Planted Too Close to Trees?
Patios and paths near trees can crack because expanding roots lift paving or because changing soil moisture causes uneven ground movement. Damage does not follow a guaranteed five-year timetable: its likelihood depends on tree species, soil conditions, construction quality and proximity. Preventing it requires allowing for mature root growth before positioning permanent surfaces.
Two mechanisms deserve separate consideration. The first is direct physical uplift: growing woody roots or the expanding buttress around a trunk displace nearby slabs. The second involves moisture-sensitive ground, particularly shrinkable clay. Trees extract water during dry periods, potentially contributing to soil shrinkage and differential movement.
The RHS advice on trees near buildings explains these mechanisms and identifies the immediate trunk area as particularly vulnerable to surface lifting.
1 metre
The RHS advises avoiding paving within this distance of a tree trunk, where buttress-root development commonly lifts surface structures. This is a precaution for the immediate trunk area, not a universal safe planting distance.
Royal Horticultural Society, Trees near buildings.
Root systems can extend far beyond the visible canopy. A proposed setback of one to one-and-a-half times the mature canopy radius may help start a design discussion, but it is not a verified safe-distance rule. The RHS notes that roots can spread much farther, so mature species characteristics, soil conditions and existing roots must govern the final layout.
Shallow-rooting tendencies are especially relevant. Ornamental cherries, including some Prunus species, can develop roots close to the surface. Willows and certain maples also warrant careful site-specific assessment because of their potential root spread and moisture demands. None should be assigned a universal exclusion distance without considering cultivar, mature size and site conditions. Deep-rooting tendencies do not guarantee that surface roots will be absent.
When cracks appear, record their location and photograph them alongside a ruler. Check whether adjacent slabs have tilted, whether roots are visibly lifting an edge and whether movement changes over time. A narrow surface crack may be cosmetic, while recurring displacement, rocking slabs or widespread settlement can indicate a problem below the bedding layer. Crack width or direction alone cannot establish the cause.
Do not cut substantial roots simply to relay paving. Root removal can destabilise or seriously damage the tree. An arboriculturist can assess whether a flexible path alignment, a different construction detail or a larger unpaved area is appropriate.
Once mature trees and their root zones have been considered, the next critical relationship is between the paved surface, the planting bed and the water flowing between them.
How to Detail the Junction Between Paved Areas and Planted Beds to Avoid Waterlogging?
The junction between paving and planting should manage surface water, retain the paving foundation and prevent soil migration. Set finished levels and drainage falls together, then choose edging suited to the site. A planted bed must not become an uncontrolled collection point for patio runoff, particularly where clay soil drains slowly.
Begin with the intended direction of water movement. Paving generally needs a designed fall towards an appropriate drainage destination, rather than towards the house or a vulnerable foundation. Where a planting bed can absorb the expected runoff, a modest difference in finished levels can help prevent soil washing onto the slabs. The actual height and fall depend on the paving system, site levels and drainage capacity.
On poorly draining ground, directing all surface water into a narrow border can saturate plant roots. A linear channel drain, suitable soakaway or another designed drainage arrangement may be necessary instead. Avoid assuming that a gravel strip beside the paving automatically solves the problem.
Three common edge treatments serve different purposes:
- Flush edging or a mowing strip: useful where a lawn or regularly maintained low border meets paving, allowing a clean transition without a raised obstacle.
- Raised edging kerb: helps contain mulch or soil on sloping borders, although openings or separate drainage may be needed to prevent water being trapped.
- Flexible edge restraint: suits curved paths and some modular paving systems, provided it is anchored and compatible with the structural design.
Below the visible edge, the interface between planting soil and the granular foundation matters just as much. A suitable separation geotextile can help prevent fine soil particles migrating into aggregate where the construction design requires it. However, a membrane is not a substitute for drainage, and its specification must suit the soil and pavement system.
Clay soils require particular attention. Observe the garden after sustained rain and check whether water remains near existing paths or in proposed planting areas. A simple infiltration test can help identify poor drainage, but it cannot replace a complete assessment of ground conditions, groundwater and available outlets.
Compacting paving directly onto unsuitable, wet clay without an appropriate foundation can lead to movement and persistent surface water. If a border already remains saturated through winter, address the drainage problem before installing the adjoining patio.
A properly detailed edge protects both the hardscape and the plants. The next choice is whether the paved surface itself should allow water to pass through.
Permeable Paving vs Traditional Slabs: Which Suits UK Rain Patterns and Planting Proximity?
Permeable paving can reduce surface runoff near planted areas, but only when its foundation and drainage arrangements can manage the water received. Traditional impermeable slabs may be preferable where a reliable drainage outlet is available or infiltration is unsuitable. UK rainfall, clay soils, nearby trees and maintenance expectations should determine the choice.
Permeable construction is a system, not simply a surface with gaps. Water passes through suitable joints or porous materials into an open-graded aggregate layer, where it may temporarily collect before infiltrating or leaving through a designed outlet.
The UK government guidance on permeable front-garden surfacing describes suitable materials, foundation construction, infiltration testing and maintenance. It explains why even open-graded aggregate must be compacted correctly.
The following comparison helps narrow the options before obtaining a site-specific specification.
| Design consideration | Permeable paving | Traditional slabs |
|---|---|---|
| Rainwater management | Allows water into a designed foundation and drainage system. | Requires falls towards a suitable drainage destination. |
| Clay-heavy soil | May need storage, an underdrain or an alternative outlet. | Can work with properly designed surface drainage. |
| Nearby trees | Root protection and potential joint disturbance still require assessment. | Roots can lift slabs and damage bedding or foundations. |
| Routine maintenance | Requires removal of sediment, leaves and debris to preserve infiltration. | Requires cleaning, joint maintenance and drainage inspection. |
| Budget | Depends on specialist materials, excavation and drainage requirements. | Depends on slab choice, foundation and drainage construction. |
On saturated clay, permeable paving without an effective outlet may simply store water that cannot escape. In that situation, the surface material is not the main design problem. The site needs an appropriate drainage strategy.
The government guidance includes a practical test using a 300 mm square pit, 300 mm deep. Its historical rule of thumb suggests that a drainage pipe may be needed when the filled pit takes more than 11 hours to empty. This is an initial screening approach, not a universal engineering standard or permission to discharge water wherever convenient.
Tree proximity adds another constraint. Roots may interfere with paving systems regardless of whether the surface is permeable. Joint growth and root disturbance must be assessed for the actual tree and construction, rather than assuming that permeable joints are either always beneficial or always problematic.
Planning rules also matter. In England, certain front-garden impermeable hard surfaces exceeding 5 m² require planning permission when runoff is not directed to an appropriate permeable area. This is not a UK-wide rule for every patio. Check current national and local planning guidance before starting work.
Even a well-drained surface can become troublesome if neighbouring plants continually shed seeds and growth across its joints.
The Planting Mistake That Turns Low-Maintenance Patios Into High-Maintenance Weed Traps
The common mistake is placing vigorous, spreading or freely self-seeding plants directly against paving without allowing for their mature growth. Stems, seeds and creeping shoots reach the joints, while accumulated debris creates opportunities for unwanted vegetation. A manageable planting edge and suitable joint maintenance usually matter more than the initial appearance.
A densely planted border can soften stone beautifully, but its maintenance demands change as plants mature. Ornamental grasses may lean over the paving, herbaceous perennials may collapse after flowering, and groundcover may creep beyond the intended bed.
The RHS advice on weeds on hard surfaces identifies self-seeding ornamentals such as Stipa, Verbena and Alchemilla as potential sources of seedlings on adjacent paths and patios. It also describes creeping plants that spread from nearby borders.
For narrow patio edges, favour plants with a predictable, compact habit and manageable seasonal growth. Suitable choices depend on light, soil, exposure and available space. Upright ornamental grasses, compact shrubs or carefully selected perennials can work well, but even apparently tidy species require checking for their mature spread and self-seeding behaviour.
A planting buffer provides space for trimming, collecting fallen material and keeping soil away from the paving. Its width should reflect the plant’s mature habit and the access needed for maintenance; there is no universal minimum suitable for every border.
Mulch can help define this separation, provided it is contained and kept from washing onto the slabs. Jointing materials also affect maintenance. Compatible bound or polymeric jointing products may reduce opportunities for seeds to establish compared with open, debris-filled joints, but they are not weed-proof. Loose grit and permeable jointing systems have different drainage and upkeep requirements, so materials must match the pavement construction.
Some vegetation between paving joints is desirable in informal or wildlife-friendly gardens. The aim is not necessarily to eliminate every plant, but to prevent unwanted growth from compromising access, drainage or safety.
Keeping plants within their intended space is easier when construction has not already damaged their roots or compacted the surrounding soil.
Should You Install Hardscapes Before or After Planting for Least Disruption?
In most new garden installations, establish levels and drainage, construct the main hardscape, restore affected planting soil, and then plant. This sequence avoids exposing newly planted beds to excavation and heavy equipment. Established gardens need a more selective approach because valuable trees and mature shrubs may require protection throughout construction.
Installing patios and paths first allows contractors to excavate, compact foundations and adjust finished levels without repeatedly moving new plants. However, construction traffic can compact nearby soil, and surplus aggregate or rubble may become mixed into borders.
The RHS guidance on new-build gardens explains that construction can leave exposed subsoil compacted and planting areas contaminated with buried material. Consequently, soil restoration after hardscape installation should be included in the work programme rather than treated as an optional finishing task.
Protect areas that will remain planted before machinery arrives. Establish access routes, avoid storing materials over sensitive roots and separate clean topsoil from excavation waste where appropriate. Existing trees may require an arboricultural assessment and a defined root-protection strategy before any digging or compaction begins.
After construction, inspect planting beds for buried rubble, unsuitable fill and compaction. Remove debris and improve the soil according to its condition. Avoid cultivating wet clay mechanically, as this can damage its structure further. Where severe compaction or drainage problems exist, appropriate remediation may require specialist advice.
In established gardens, compare the practical implications of preserving mature planting with those of carefully phased replacement. Mature trees often provide benefits that cannot be restored quickly. Root cutting, excavation and heavy traffic should not be undertaken merely because removal appears convenient.
Planting first may still be sensible in areas completely isolated from construction, or where protecting established plants dictates the project layout. The important distinction is between a planned exception and an accidental sequence that exposes plants to preventable disturbance.
Once the construction order is clear, the wider design decisions can be arranged so that expensive, difficult-to-reverse work is settled first.
In What Order Should You Make Design Decisions to Avoid Costly Garden Redesigns?
Make garden design decisions in order of their consequences: assess drainage and levels first, establish access and major hardscape positions, protect or position structural planting, then refine borders and decorative details. Permanent construction decisions are expensive to reverse, while many planting and furnishing choices remain comparatively flexible.
Begin by surveying existing ground levels, buildings, trees, boundaries and access routes. Observe where water collects during wet weather and identify any restrictions on excavation or drainage discharge. A garden layout that looks attractive on paper may be impractical if the proposed patio falls towards the house or crosses an important root zone.
Next, confirm circulation. Paths should connect doors, seating areas, storage and working parts of the garden without forcing unnecessary detours. Consider how wheelbarrows, maintenance equipment and everyday users will move through the space.
Then determine the position and dimensions of permanent structures. Account for the mature canopy and spread of trees and shrubs before finalising paving boundaries. This avoids selecting a planting scheme that later obstructs a narrow route or interferes with retaining structures.
Only after these decisions should detailed planting combinations, furniture and decorative finishes take priority.
Some decisions are particularly costly to change:
- High-cost changes: drainage routes, excavation levels, retaining structures, sub-base construction and major paving alignment.
- More adaptable choices: many perennials, movable containers, garden furniture and seasonal planting arrangements.
Before ordering materials, use one coordinated plan to confirm dimensions, drainage destinations, finished levels and mature plant clearances. Aesthetic preferences still matter, but they should operate within a technically workable layout.
Five checks to complete before construction
- Survey the garden and record existing levels, boundaries and obstacles on a dimensioned site sketch.
- Inspect drainage conditions and mark proposed water-flow directions and outlets on the plan.
- Plot existing trees and expected mature planting footprints, producing a drawing of protected and available construction areas.
- Confirm routes, patio dimensions and finished levels in a coordinated layout drawing.
- Review the construction sequence and produce a written checklist covering access protection, excavation, soil restoration and planting.
A coordinated design reduces the likelihood of expensive alterations, but the foundation beneath each path must still be built for the ground conditions and expected loads.
The Foundation Error That Causes Garden Paths to Fail Before Their Second Winter
Garden paths can fail early when their sub-base is too shallow, unsuitable or inadequately compacted for the ground and intended use. Disturbed soil and moisture-sensitive clay increase the risk of settlement and movement during wet and freezing conditions. Correct foundation preparation, drainage and edge restraint matter more than the surface material alone.
A path may look level immediately after installation even though its bedding rests on poorly consolidated ground. As the ground becomes wet, dries or freezes, weak areas can settle or move unevenly. The result may be rocking slabs, widening joints or dips that collect water.
The required construction depends on the loading. A lightly used pedestrian path does not necessarily need the same specification as an access route carrying heavy garden machinery or occasional vehicles.
Consider three different scenarios:
- Pedestrian-only garden path: design for regular walking, stable bedding, suitable drainage and the actual soil conditions.
- Path used by loaded wheelbarrows: consider repeated concentrated loads, turning movements and edge stability.
- Occasional vehicle access: obtain a specification appropriate to vehicle loading rather than relying on a standard pedestrian construction.
There is no single sub-base depth suitable for every combination of clay, disturbed ground, paving material and load. Ask the installer to explain the proposed excavation depth, aggregate type, compaction method and drainage arrangements. Where the ground is particularly weak or the loading substantial, specialist design may be appropriate.
Edge restraint is another important detail. Without adequate lateral support, some paving systems can spread sideways, allowing bedding or aggregate to migrate and the surface to deform. The restraint must match the pavement type and site conditions.
For an existing failing path, inspect the whole surface before repairing isolated cracks. Look for outward movement at the edges, hollow-sounding or rocking slabs, recurring puddles and cracks that return after previous repairs.
Localised defects with a sound foundation may justify lifting and relaying a small area. Repeated movement across a longer section can indicate that the foundation or drainage needs rebuilding. Simply covering unstable paving with another surface rarely addresses the underlying cause.
Reliable foundations also make it possible to incorporate permanent garden features that remain attractive and functional throughout the year.
Key takeaways before adding permanent garden features
- Choose permanent features only after their foundations, drainage effects and relationship to nearby roots have been assessed.
- Use walls, raised beds and vertical structures to organise planting and maintenance access, not simply to fill empty space.
- Specify materials for moisture exposure, frost resistance and the maintenance they will require in the UK climate.
How Do Stone or Wood Garden Features Create Year-Round Structure When Plants Die Back?
Stone and timber features give gardens a lasting framework when deciduous planting loses its leaves or herbaceous borders die back. Walls, pergolas, raised beds and carefully positioned boulders define spaces and provide visual interest throughout winter. Their greatest value comes when they also support drainage, planting separation and practical maintenance.
Permanent features serve two overlapping purposes. Some provide visual structure: a pergola frames a view, a stone wall anchors a border, and a specimen boulder creates a focal point among seasonal plants. Others help organise the working garden by retaining soil, defining access or separating planting from paved areas.
Combining these purposes can make a garden more coherent. A raised bed, for example, may establish a strong visual boundary while containing soil and preventing mulch from spilling across an adjacent path. A retaining wall may create a level terrace, but it also needs appropriate structural design and drainage to manage the ground behind it.
Materials must suit their exposure. Timber in contact with soil or persistent moisture requires suitable durability or treatment for that use, with detailing that avoids unnecessary water retention. Untreated or unsuitable timber can deteriorate prematurely, particularly at ground level.
Natural stone varies in porosity, strength and resistance to freeze-thaw weathering. Select products appropriate for external use and the local exposure conditions. Drainage and installation quality remain important even when the stone itself is durable.
Position features with maintenance access in mind. A pergola should not obstruct necessary tree care, a raised bed should not trap water against a building, and a decorative boulder should not block an existing drainage route. Benches and water features also need stable, well-drained locations rather than positions chosen purely for appearance.
Winter provides a useful design test. Imagine the garden without its summer foliage. If the paths still connect naturally, the structures define clear spaces and the borders remain accessible, the hard and soft landscape elements are likely to work together more successfully.
For the next practical step, prepare a scaled garden plan showing existing trees, drainage directions, permanent structures and mature planting footprints. Review it with a landscape contractor before ordering paving or planting materials, and resolve any overlapping root zones, drainage routes or maintenance access requirements while changes are still straightforward.
Can a patio be installed around an existing mature tree?
Sometimes, but the design must protect the tree’s roots and allow for future growth. Avoid paving immediately against the trunk and do not excavate or cut substantial roots without professional assessment. A curved path, larger open planting area or appropriately designed alternative surface may be more suitable than conventional paving.
Should a planted border be higher or lower than the patio?
The correct relationship depends on drainage and edging. Keeping loose soil and mulch below the paving surface can reduce material washing onto slabs, but runoff must have a suitable destination. A lower border on poorly draining clay can become waterlogged if the entire patio drains into it.
Does permeable paving eliminate the need for garden drainage?
No. Permeable paving needs a suitable foundation and a way for collected water to infiltrate, be stored or drain away. Where clay soil is saturated or infiltration is inadequate, an underdrain or another designed outlet may be necessary. Surface permeability alone does not guarantee effective drainage.
Can planting beds be added after a patio has already been built?
Yes, provided excavation and soil preparation do not undermine the existing paving foundation or damage nearby roots. Check edging stability, finished levels and drainage before introducing soil or plants. Avoid placing new beds where irrigation or runoff would repeatedly saturate the patio’s supporting ground.
How often should paving edges and planting borders be inspected?
Inspect them after prolonged rainfall, during seasonal garden maintenance and whenever visible movement develops. Look for blocked drainage, soil washing onto paving, seedlings in joints, spreading plants and lifting slabs. The appropriate frequency depends on local conditions, nearby trees and the amount of debris produced by surrounding planting.