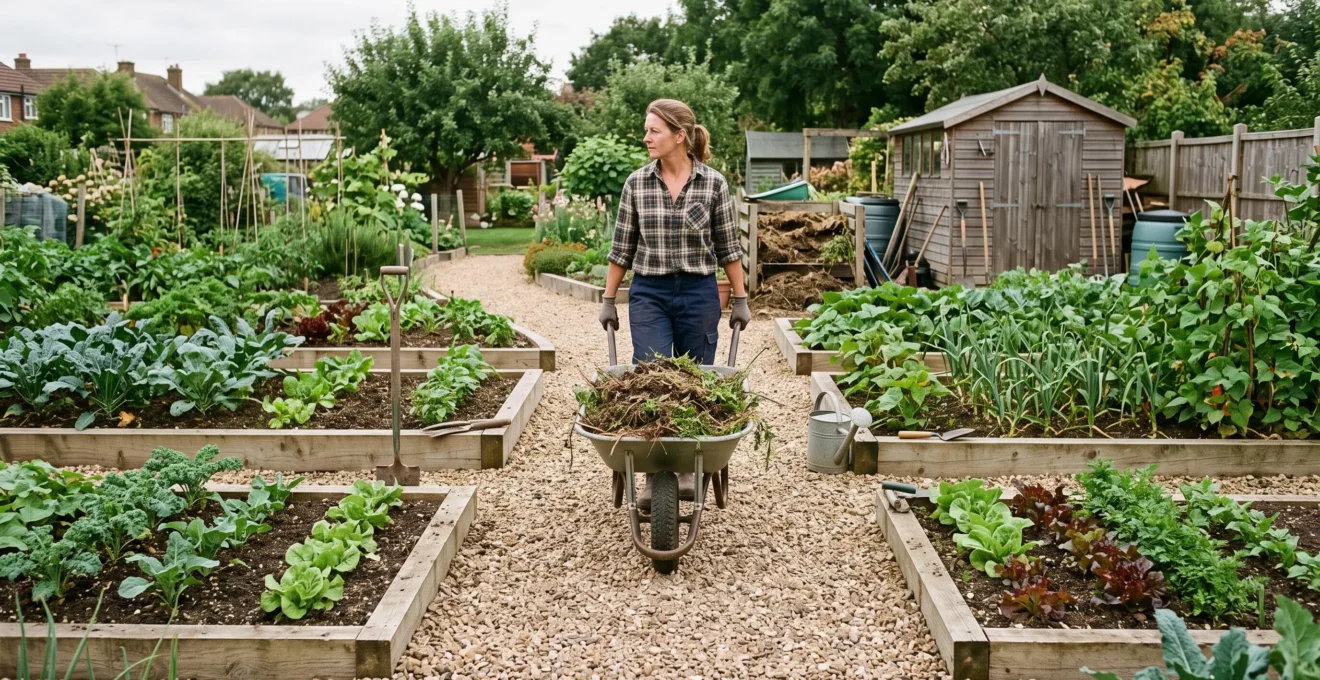
A garden can be beautiful yet surprisingly exhausting to maintain. The problem is often not the number of plants but the distance between everyday tasks, the awkward position of equipment and the absence of reliable access routes. A watering session becomes a series of unnecessary journeys. Pruning requires stepping into borders. Moving compost involves negotiating narrow corners.
Functional garden layout design reduces maintenance effort by organising circulation, planting beds and workstations around the jobs gardeners actually perform. A 40% reduction in maintenance time can serve as an ambitious planning target, but it is not a scientifically established outcome of garden redesign. Actual savings depend on the original layout, garden size, planting choices and tasks measured.
For busy gardeners, particularly those managing compact UK gardens around work and family commitments, the practical starting point is straightforward: observe where time disappears, remove unnecessary movement and make frequently repeated jobs easier. The result can be an outdoor space that remains attractive while demanding less physical effort.
Functional garden design: the essentials
- Protect planting areas with accessible paths that prevent soil compaction and accommodate real gardening equipment.
- Position tools, water and compost according to how frequently they are used, rather than hiding everything at the far end of the plot.
- Measure maintenance time before and after layout improvements instead of assuming a fixed percentage saving.
- Why Do Narrow or Absent Paths Force You to Trample Plants During Routine Maintenance?
- How to Position Your Compost Bin, Tool Shed, and Potting Bench for Maximum Efficiency?
- Open-Flow Gardens vs Defined Rooms: Which Layout Works Best for Multi-Use Outdoor Spaces?
- The Path Width Error That Turns Simple Jobs Into Frustrating Obstacle Courses
- Should You Design Garden Layout for Beauty First or Function First?
- How to Position Key Features Using the Rule of Thirds for Maximum Garden Impact?
- How Much Space Should You Leave Between Plants to Ensure Disease-Preventing Airflow?
- What Makes Garden Paths Both Practical for Daily Use and Beautiful to Look At?
Why Do Narrow or Absent Paths Force You to Trample Plants During Routine Maintenance?
Narrow or missing garden paths force gardeners to step onto planted soil because routine jobs require more working space than the planting layout provides. Weeding, pruning and harvesting all involve reaching, bending or carrying equipment. Without dedicated access, these movements damage foliage, compress soil and make subsequent maintenance more difficult.
Every gardening task has a maintenance footprint: the space occupied by the gardener, tools and movement needed to complete it. A border may look accessible when empty, yet become difficult to manage once plants reach their mature size.
When gardeners repeatedly step into cultivated beds, pressure compresses the soil. Reduced pore space can restrict air and water movement, making root development more difficult. University of Minnesota Extension explains these relationships in its advice on healthy garden soil and designated walking paths.
This can create a maintenance feedback loop. Poorer growing conditions may require additional attention, while every extra visit risks further disturbance. It is not inevitable that every compacted bed will require more work, but preventing unnecessary foot traffic removes one avoidable source of plant stress.
A practical way to identify missing access is to map your movements for a week. During normal gardening sessions, record where you stand, kneel and turn. Mark recurring footfall locations using temporary stakes or string, without damaging plants.
Look for repeated access points rather than trying to pave every part of the garden. A narrow side passage, stepping stones or an accessible border edge may resolve a problem without sacrificing an entire growing bed.
In a small urban garden, the objective is not to maximise path area. It is to ensure that every frequently maintained plant can be reached from stable ground. Beds accessible from both sides can remain productive without requiring gardeners to walk across them.
Once access routes are clear, the next opportunity is to shorten the journeys between the places where gardening work begins and ends.
How to Position Your Compost Bin, Tool Shed, and Potting Bench for Maximum Efficiency?
Position garden workstations according to how frequently you visit them and which tasks connect them. Frequently used tools and watering equipment should be easy to reach, while compost bins need practical access from both the kitchen and planting areas. A potting bench works best when water, tools and materials are nearby.
The trip-frequency positioning rule is a useful planning heuristic: put high-frequency activities on convenient routes and allow less frequently used facilities to occupy more distant positions.
Start by identifying what you actually do each day or week. Harvesting vegetables may involve frequent visits to the kitchen door. Filling watering cans may require several journeys during dry weather. Compost handling, seed sowing and major pruning can follow different seasonal patterns.
Instead of arranging infrastructure solely by appearance, sketch the connections between activities. This reveals whether a shed, tap or workbench is unnecessarily isolated.
The wet-work triangle offers another practical concept. Imagine three points: the potting bench, water supply and tool storage. Keeping these facilities conveniently connected reduces repeated walking during sowing, transplanting and cleaning. This is a workflow analogy, not a validated formula with prescribed distances.
Compost placement requires a balance between convenience and suitable growing conditions. The Royal Horticultural Society‘s guidance on compost-bin placement recommends accessible, sheltered positions with partial or full shade. Drainage and aeration also matter.
Where possible, choose a location that can be reached with a wheelbarrow from the growing beds. Consider nearby windows, neighbours and prevailing winds, but remember that unpleasant smells and pests are also influenced by how compost is managed, not simply its distance from the house.
A poorly positioned shed creates an additional problem: returning tools becomes inconvenient. Equipment may be left outdoors, increasing the risk of weather damage and time spent retrieving it later.
Build a five-step garden efficiency map
- Record routine gardening activities for seven days and produce a simple task-frequency list.
- Mark the kitchen door, growing beds, water source, shed, compost bin and potting bench on a scaled or approximate garden sketch.
- Draw the journeys between these locations and identify the three routes used most often.
- Test a more convenient workstation arrangement using temporary markers, producing a revised layout sketch.
- Time comparable tasks before and after the changes, keeping a dated record of minutes spent.
The most efficient arrangement is not necessarily the most compact one. It is the layout that supports actual gardening routines while preserving comfortable circulation and appropriate growing conditions.
Open-Flow Gardens vs Defined Rooms: Which Layout Works Best for Multi-Use Outdoor Spaces?
Open-flow gardens generally make movement and equipment access easier, while defined garden rooms allow different activities to have separate maintenance requirements. For a garden combining relaxation, growing, play and storage, partially defined zones often provide a useful compromise: clear functions without excessive barriers or complicated circulation.
An open-flow layout uses connected spaces, relatively uninterrupted views and accessible routes. It can make moving a wheelbarrow or mower straightforward, particularly where the garden is narrow or regularly used for several activities.
However, the absence of clear boundaries can make it harder to distinguish working areas from recreational ones. Tools may migrate into seating areas, and unused corners can become neglected because they have no defined purpose.
Garden rooms establish more distinct functions. A productive growing area might receive frequent attention, while a seating zone requires only occasional cleaning. This separation makes it easier to schedule maintenance according to actual needs.
Before choosing a layout, compare the practical consequences rather than relying on visual preference alone.
| Decision factor | Open-flow layout | Defined garden rooms |
|---|---|---|
| Equipment movement | Usually easier along uninterrupted routes | Depends on openings, gates and connections |
| Multiple activities | Flexible but potentially overlapping | Clearer separation of uses |
| Children and pets | More shared space | Can separate sensitive planting from play |
| Maintenance scheduling | Less obvious zone boundaries | Different routines can be assigned to each zone |
| Construction demands | Can require fewer physical divisions | May involve additional structures and materials |
A hybrid layout can use trellises, low hedges, planting changes or subtle level differences to create a sense of enclosure without closing every route. These elements can visually distinguish activities while retaining practical access.
Be cautious about over-compartmentalisation. A succession of narrow gates, dead ends and isolated corners can multiply walking distances. Conversely, an entirely open design may leave awkward leftover spaces that require attention without serving a clear purpose.
Whichever arrangement you choose, its success depends on the circulation connecting the zones. That makes path dimensions a critical decision before any permanent landscaping begins.
The Path Width Error That Turns Simple Jobs Into Frustrating Obstacle Courses
The most common path-width mistake is designing for a person walking empty-handed rather than someone carrying tools or pushing equipment. A route that feels comfortable during a casual stroll may become impractical with a loaded wheelbarrow. Width should therefore be tested against actual equipment, turning space and the narrowest point of the route.
Garden paths are working surfaces, not merely decorative lines. Their dimensions affect whether tasks can be completed smoothly or require repeated stopping, lifting and repositioning.
For raised-bed gardening, the Royal Horticultural Society recommends paths at least 45 cm wide to accommodate a wheelbarrow and at least 1 m where wheelchair access is needed. These are contextual recommendations, not guarantees that every wheelbarrow, turning manoeuvre or accessibility requirement will fit.
The same RHS guidance advises raised beds generally narrower than 1.5 m so gardeners can reach their centres without standing on the soil. Bed and path dimensions must therefore be considered together.
Before laying paving or gravel, perform an obstacle walk. Push your actual wheelbarrow along the proposed route, ideally with a representative load. Carry a harvesting basket, turn at corners and kneel where edging or weeding will be necessary.
Notice where handles catch planting, wheels strike borders or knees have insufficient room. Repeat the exercise at gates and junctions, since these are often the places where a nominally wide route becomes unusable.
Consistency matters as much as headline width. A generous main path offers limited benefit if it narrows abruptly behind a shed or at a gate. Design the complete journey around the most restrictive point.
Wider paths do consume growing space and may increase construction costs. Vertical planting along fences, productive border edges and carefully selected permeable surfaces can help make the remaining area work harder. These choices do not automatically compensate for the space or expense, but they can improve the overall balance.
A route that accommodates real tasks can also become an attractive design feature. Its alignment and proportions help shape the garden’s appearance, linking practical planning to visual composition.
Should You Design Garden Layout for Beauty First or Function First?
Design garden function first at the structural level, then develop the visual composition around it. Paths, access points, planting zones and service areas determine how comfortably the space operates. Once these are established, attractive planting, focal points and materials can reinforce the layout rather than conceal practical problems.
Beauty and function are not inherently competing objectives. A well-positioned path creates a sightline. A productive border can frame a seating area. A discreet storage zone can preserve the appearance of the main garden while keeping essential equipment accessible.
Problems arise when appearance is planned without considering maintenance. A striking ornamental border may become difficult to prune if no route reaches its centre. Closely clipped edging can look impressive but commit the gardener to frequent trimming.
These are examples of cosmetic maintenance costs: recurring work created by design decisions rather than by the fundamental needs of the plants.
A practical design sequence begins with circulation. Mark the house entrances, frequently used destinations and equipment routes. Next, allocate working and leisure zones. Then select planting structures, focal features and materials that support those routes.
At each stage, test whether a wheelbarrow can reach the growing beds and whether maintenance can take place without damaging adjacent planting.
Consider an ornamental garden with a formal central view. Its decorative planting might appear to dominate the design, while service access, compost handling and plant preparation are organised discreetly behind hedges. The visible result can be highly ornamental even though its underlying arrangement is strongly functional.
That illustrates why functional planning need not produce a utilitarian appearance. The best circulation decisions can be visually unobtrusive.
With circulation and working zones settled, visual design becomes more deliberate. The next step is positioning features where they improve both the view and the experience of moving through the garden.
How to Position Key Features Using the Rule of Thirds for Maximum Garden Impact?
The rule of thirds helps position garden focal points away from predictable central locations. Divide the visible garden into three horizontal and three vertical sections, then consider placing major features near the grid intersections. For functional design, those features should also connect logically with paths, seating areas and maintenance access.
The principle comes from visual composition. A specimen tree, bench or water feature placed slightly off-centre can create a more dynamic relationship between foreground, background and surrounding planting.
In a small garden, the technique can help prevent the entire space from appearing organised around a single central object. Instead, the eye travels between features at different positions and depths.
However, visual placement must not override accessibility. A bench positioned beautifully on a grid intersection is less useful if reaching it involves crossing wet grass or stepping through planted borders.
Try placing the main focal point near an existing path junction or at the end of a clear sightline. This allows the same feature to support visual interest and everyday circulation.
The thirds concept can also inform vertical composition. Low ground cover, medium-height shrubs and taller structural planting can be distributed to create depth. In a narrow urban plot, layered planting can make the space feel more varied without introducing unnecessary barriers.
Use the grid selectively. Applying it rigidly to every bed and object may create a formulaic appearance, while natural growth will gradually soften carefully measured alignments.
For a practical test, photograph the garden from the kitchen door or principal seating area. Overlay an imaginary thirds grid and identify one feature that could be repositioned or visually emphasised. Then check whether the proposed location remains convenient to maintain.
Once the main features are positioned, the planting around them must be given enough space to mature without creating inaccessible, overcrowded areas.
How Much Space Should You Leave Between Plants to Ensure Disease-Preventing Airflow?
Leave enough space between plants for their mature canopies to develop without persistent overcrowding and for air to circulate around susceptible foliage. There is no universal spacing distance that prevents fungal disease. Suitable gaps depend on plant species, mature dimensions, local conditions, pruning practices and the way water is applied.
Spacing is both a plant-health decision and a maintenance-efficiency decision. Crowded borders can be difficult to inspect, prune and weed. Dense growth may also restrict airflow, creating conditions that favour some fungal diseases.
The Royal Horticultural Society’s guidance on powdery mildew and plant spacing identifies poor air circulation and high humidity as relevant risk factors. It recommends avoiding excessively dense planting and using selective pruning to improve air movement.
Different diseases behave differently. Powdery mildew, for example, can develop without free water on leaves, whereas prolonged leaf wetness is more important for some other fungal problems. It would therefore be misleading to assume that keeping foliage dry prevents every disease.
When planning spacing, consider several interacting variables:
- Mature plant width: use the expected full-grown spread rather than the size of a young plant in its pot.
- Local exposure: sheltered corners and areas against walls may have less air movement.
- Humidity and rainfall: conditions vary between locations and seasons.
- Watering method: irrigation that repeatedly wets foliage may influence certain disease risks.
- Maintenance access: leave sufficient room to inspect and prune plants without forcing a route through dense growth.
After a growing season, inspect the border for signs of persistent crowding. Inner leaves that remain damp, poor airflow or recurring disease symptoms can indicate a need to reassess spacing, watering or pruning. This observation method is a practical diagnostic suggestion, not a scientifically validated test.
Avoid treating wider spacing as an automatic solution to every plant-health problem. Plant choice, soil conditions, exposure and disease susceptibility still matter.
Healthy planting that can be reached comfortably is easier to manage. The final design decision is how to make the paths connecting these areas attractive, durable and straightforward to maintain.
Key takeaways before choosing path materials
- Test the complete route with actual gardening equipment before choosing its surface or final alignment.
- Consider wet-weather grip, drainage and weed management alongside appearance.
- Design path edges as carefully as the central surface because border encroachment creates recurring maintenance work.
What Makes Garden Paths Both Practical for Daily Use and Beautiful to Look At?
Practical, attractive garden paths combine comfortable movement, suitable surfaces, manageable edges and purposeful destinations. Their beauty comes not only from materials but also from how they guide the eye and connect useful spaces. A successful path remains safe and convenient during routine work while complementing the surrounding planting.
Start with the destination principle: every main path should lead somewhere meaningful. That destination might be a bench, productive growing bed, shed, compost area or quiet seating corner.
A gently curved path can reveal planting gradually, making a short journey feel more engaging. However, unnecessary curves can make moving equipment harder. The route should remain natural for the task it serves.
Material choice has a direct effect on long-term maintenance. Consider how each surface behaves in wet weather, how easily weeds can establish in joints and whether wheels move comfortably across it.
| Material | Practical advantages | Maintenance considerations |
|---|---|---|
| Compacted gravel | Informal appearance; potentially permeable when properly constructed | Loose stones, migration and weed growth may need attention |
| Paving slabs | Can provide a stable route for wheeled equipment | Joints require maintenance; some finishes become slippery when wet |
| Stepping stones | Useful for occasional access through planted areas | Less convenient for wheelbarrows and continuous equipment movement |
| Bound or stabilised surfaces | Can offer a more continuous walking and wheeling surface | Performance depends on specification, installation and drainage |
For frequent wheelbarrow journeys, surface stability may matter more than decorative texture. In a garden primarily used for occasional walking, a lighter-touch route may be sufficient.
Edges deserve particular attention because creeping plants, grass and weeds can gradually blur the boundary between paths and borders. Suitable edging can reduce this encroachment and make maintenance more predictable.
Steel edging can create a defined boundary, while carefully selected low-growing plants can soften a transition between hard landscaping and borders. Neither option is maintenance-free: edging needs appropriate installation, and ground cover must be selected and managed to avoid spreading into the route.
In gardens with lawns, an appropriately designed mowing strip can simplify edge maintenance. The best treatment depends on the surface, surrounding planting and equipment used.
To evaluate whether redesign is achieving the intended time saving, record comparable maintenance activities before and after changes. For example, in a purely hypothetical scenario, reducing a recurring task from 50 minutes to 30 minutes represents a 40% reduction for that task. It does not demonstrate a 40% reduction in total garden maintenance.
For a meaningful garden-wide comparison, include watering, weeding, pruning, equipment retrieval, compost handling and path upkeep. Compare similar seasons and account for changes in weather, plant growth and gardening frequency.
Begin with one troublesome route this week. Observe the journeys it creates, test a simpler alignment and measure the time required for the same task afterwards. Small, verified improvements provide a sounder foundation for a low-maintenance garden than an unsupported promise of a fixed percentage saving.
Can a garden redesign really reduce maintenance time by 40%?
A 40% reduction is a possible project target, not a verified general result. Savings depend on the existing layout and the work being measured. Time repeated tasks before and after changes, then compare equivalent activities and conditions to determine the actual improvement.
What is the cheapest way to improve an inefficient garden layout?
Start by changing the position of movable equipment, introducing temporary access routes and reorganising frequently used tools. These measures allow you to test circulation improvements before paying for permanent paths, raised beds or new structures.
How can a small garden accommodate paths without losing too much planting space?
Concentrate paths where access is genuinely needed, use beds reachable from their edges and consider vertical growing. Stepping stones can provide occasional access, but routes used by wheelbarrows or mobility equipment need more continuous, appropriately sized surfaces.
Should irrigation be redesigned before moving garden beds?
Review irrigation and bed placement together. Water-source location influences carrying distances and hose routes, while planting positions determine where water is needed. A combined plan helps avoid installing beds that later obstruct watering or require repeated equipment movement.
How often should a functional garden layout be reassessed?
Review access and maintenance after a full growing season, when plants have expanded and typical tasks have been repeated. Reassess sooner if equipment cannot pass comfortably, plants obstruct routes or new household activities change how the garden is used.