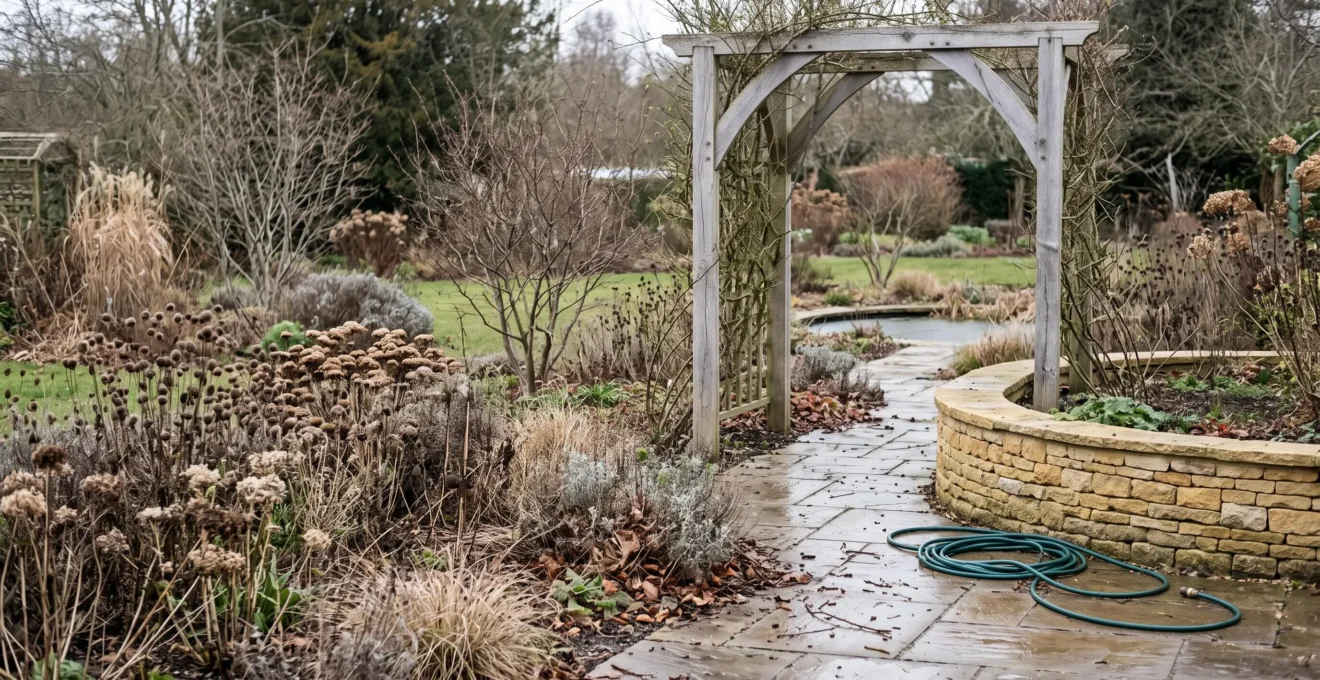
A garden that depends entirely on flowers and foliage can lose much of its definition in winter. Herbaceous borders retreat, deciduous shrubs become transparent, and familiar paths may suddenly seem exposed. Stone and wood garden features provide the permanent framework that keeps these spaces recognisable through every season.
An oak arch establishes height, a limestone wall defines a boundary, and a raised bed maintains the shape of a planting area even when its contents are dormant. Their surfaces also change gradually with exposure, adding texture and character without depending on seasonal growth.
The strongest four-season designs begin with durable materials, appropriate construction and deliberate placement. Stone must withstand local moisture and frost conditions. Timber needs protection suited to its exposure. Paths and planting beds must work together rather than compete for drainage or maintenance space.
Choosing these structural elements carefully creates a garden whose underlying design remains visible in January as clearly as it does in June.
Building a garden that holds its shape all year
- Use stone walls, timber arches, raised beds and defined paths to create permanent height, boundaries and visual anchors.
- Choose materials for their exposure conditions and construction requirements, not simply their initial colour or appearance.
- Plan drainage, soil settlement and planting access together to prevent premature deterioration and recurring maintenance problems.
- Why Does Oak Weather to Silver While Limestone Weathers to Gold in British Gardens?
- How to Identify and Source Stone or Wood Native to Your UK Region for Authentic Features?
- Dressed Stone vs Natural Boulders: Which Suits Traditional UK Cottage Garden Aesthetics?
- The Timber Choice That Leads to Structural Failure and Costly Replacement Before 5 Years
- When Should You Install Stone or Wood Features to Allow Proper Settlement Before Planting?
- Timber vs Metal vs Stone: Which Raised Bed Material Lasts Longest in Wet UK Climates?
- Permeable Paving vs Traditional Slabs: Which Suits UK Rain Patterns and Planting Proximity?
- How Should Hardscapes and Planted Areas Interact to Prevent Maintenance Conflicts?
Why Does Oak Weather to Silver While Limestone Weathers to Gold in British Gardens?
Oak commonly develops a silvery-grey surface as sunlight and moisture alter its exposed wood fibres and natural colouring. Some limestones acquire warmer honey or golden tones through their mineral composition, surface deposits and weathering. Neither transformation is universal: the final appearance depends on the particular material, its exposure and surrounding environmental conditions.
Fresh oak often displays warm brown tones, partly influenced by its natural extractives, including tannins. As weathering progresses, sunlight changes the surface chemistry while rain removes or redistributes some coloured compounds. The exposed surface becomes paler and greyer. Oak’s distinctive grain remains visible, giving an established arch or bench a textured appearance.
Limestone behaves differently. Its colour depends on the stone’s original mineral constituents, impurities and deposits accumulated during exposure. Iron-bearing constituents may contribute warmer tones, while biological growth, dirt and atmospheric deposits can produce darker or greener surfaces. Golden weathering is a possibility, not a guaranteed outcome.
The important distinction is between a surface that changes colour and one that loses integrity. Uniform greying of sound timber can be cosmetic. Soft, crumbling wood, deep structural splits or persistent moisture around joints deserve closer inspection. Similarly, a limestone surface may change colour without becoming weaker, whereas flaking, powdering or detached stone fragments can indicate deterioration.
Historic England‘s technical guidance on masonry buildings explains how pore structure, moisture movement, salts and freezing conditions influence stone deterioration. Different limestones can respond very differently to the same exposure.
Before selecting either material, place a representative sample against existing brickwork, fencing and paving. Examine it in overcast daylight as well as brighter conditions. A warm stone that complements red brick may compete with pale paving; silvered oak may provide a quieter contrast.
Do not assume every hardwood will age like oak or every sandstone will survive repeated freezing. Species, treatment, stone composition and moisture exposure matter more than a generic material label.
Once the desired ageing character is clear, the next decision is where to obtain material that belongs naturally within the garden’s regional setting.
How to Identify and Source Stone or Wood Native to Your UK Region for Authentic Features?
Start by examining traditional buildings, boundary walls and older garden structures in your area. Their materials reveal the local architectural character. Then compare reclaimed stone, regional quarry products and suitable timber from reputable suppliers, checking provenance, durability and intended outdoor use rather than assuming that a locally familiar appearance guarantees performance.
In parts of the Cotswolds, warm-toned limestone helps define the landscape. Other regions have traditions associated with sandstone, granite, slate or locally available building stone. The aim is not to reproduce historic construction exactly but to identify the geological and architectural vocabulary already present.
Look at the colour of weathered surfaces, the scale of masonry blocks, visible bedding planes and the way older walls meet the ground. A newly constructed retaining edge using similar proportions may appear more established than one assembled from an unrelated decorative stone.
There are three practical sourcing routes:
- Reclamation yards: useful for existing patina and irregular historic dimensions, although quantities, previous exposure and exact provenance may be uncertain.
- Local quarries and sawmills: potentially better for consistent supply, specifications and matching future additions.
- Materials already on site: excavated stone or suitable felled timber may preserve local character, provided their condition, ownership and suitability are established.
Ask stone suppliers to identify the geological type, quarry origin where known, suitable applications and available frost-resistance or water-absorption information. Stone from another region is not automatically unsuitable, but visual similarity cannot establish comparable performance.
For timber, request the species, whether the supplied sections contain sapwood, their seasoning or moisture condition, and any preservative specification. Moisture readings can help assess timber at delivery, but a single reading cannot establish how long it will survive outdoors. Its final exposure and construction details remain decisive.
Five checks before ordering regional garden materials
- Photograph three nearby examples of traditional stone or timber construction and assemble a visual reference sheet.
- Identify the proposed material’s geological type or timber species and record the supplier’s description.
- Request written information on frost suitability for stone or treatment and intended exposure for timber.
- Compare a physical sample against existing garden surfaces and retain a dated photograph of the comparison.
- Record dimensions, quantities, provenance information and any unresolved specification questions in a purchase checklist.
Authenticity should be assessed through a combination of geological character, local weathering patterns and construction details. For layered stone, appropriate bedding orientation is also a technical matter, not merely a visual preference.
With material provenance established, the form of the feature becomes the next design question: should it look deliberately constructed or naturally embedded in the landscape?
Dressed Stone vs Natural Boulders: Which Suits Traditional UK Cottage Garden Aesthetics?
Dressed stone generally suits cottage gardens with defined paths, traditional masonry and carefully organised borders. Natural boulders work better where planting is loose and the design should feel less formal. Neither is inherently more authentic: the appropriate choice depends on the house, existing landscape and whether the feature should provide a visible boundary or blend into planting.
Dressed stone has deliberately worked faces and controlled dimensions. It creates recognisable lines in low walls, steps and edging. A neatly constructed stone border can hold the shape of a garden through winter even when the plants behind it have disappeared.
Natural boulders provide irregular shapes and less predictable outlines. They can anchor a sloping border, form the edge of a water feature or create sheltered planting pockets. Their effectiveness depends on convincing placement: stones that appear to sit loosely on the soil can look decorative rather than integrated.
The following comparison helps determine which approach fits the existing garden.
| Design criterion | Dressed stone | Natural boulders |
|---|---|---|
| House character | Complements formal masonry and defined architectural lines | Suits rustic or landscape-led settings |
| Primary purpose | Walls, steps, raised edges and regular paths | Planting pockets, informal boundaries and focal points |
| Visual effect | Clear geometry and deliberate structure | Irregular texture and naturalistic mass |
| Installation | May require accurately prepared foundations, skilled laying and mortar | Requires secure bedding, suitable support and safe handling of heavy stones |
| Relationship with plants | Creates a defined edge | Allows planting to soften an irregular outline |
Installation quality matters whichever approach is chosen. Dressed masonry must be supported and detailed appropriately for its height and loading. Boulders require stable placement and sufficient support so they cannot rock, roll or shift. Large stones and retaining structures warrant professional assessment.
A common visual mistake is combining polished cut blocks, random rubble and large boulders without a clear hierarchy. Instead, select one dominant stone treatment and use the other sparingly. For example, a dressed limestone retaining edge might be complemented by a small number of irregular stones within the planting.
Consider the winter silhouette before deciding. A low dressed wall produces a continuous horizontal line, whereas grouped boulders create separate visual masses. Both can be effective, but they organise the garden differently.
The same principle of matching material to function becomes even more important with timber, where an unsuitable specification can lead to structural failure rather than merely an awkward appearance.
The Timber Choice That Leads to Structural Failure and Costly Replacement Before 5 Years
Untreated or inadequately protected softwood used in persistent ground contact is a high-risk choice for permanent garden structures. Failure within five years is possible under unfavourable conditions, but it is not a universal lifespan. Actual durability depends on timber species, preservative treatment, drainage, structural detailing and how frequently the wood remains wet.
The vulnerable area is often the junction between a timber post and the surrounding soil. Water accumulates, drying is restricted, and biological decay can develop in susceptible wood. Untreated sapwood is particularly vulnerable. A post may still look acceptable above ground while becoming weak at its base.
Corroding fixings introduce another problem. Rusting connectors may lose strength, stain adjacent wood or contribute to splitting as joints deteriorate. Poorly positioned fasteners and water-trapping joints increase the risk.
The treatment specification must match the exposure. The Timber Decking & Cladding Association‘s timber preservation guidance distinguishes Use Class 3 timber, intended for exterior exposure without ground contact, from Use Class 4 timber, intended for ground contact or comparable severe wetting conditions.
For a garden structure, the main options have different implications:
- Pressure-treated softwood: can be economical, provided the treatment is specified for the actual exposure and the structure is properly detailed.
- Naturally durable hardwood: suitable heartwood from species such as oak can provide a traditional appearance, although durability varies with species, section and sapwood content.
- Timber raised above the ground: metal post supports or appropriately designed stone footings can reduce direct soil contact, provided water cannot remain trapped at the connection.
Dip treatment and surface-applied coatings should not be assumed equivalent to industrial pressure treatment for demanding ground-contact applications. Ask the supplier for written confirmation of the Use Class and the intended service-life specification. A specified service life is a design or treatment target, not a guarantee of actual performance.
Inspect delivered timber for damage and exposed untreated-looking cuts, but do not rely on visual inspection alone to prove preservative penetration. Cut ends, drilled holes and site modifications may need treatment in accordance with the supplier’s instructions.
Drainage and connection details remain essential even when the timber is correctly specified. Keeping structural components clear of persistent standing water can be as important as the species selected.
Once the right material has been chosen, its installation sequence must protect both the structure and the planting that will eventually surround it.
When Should You Install Stone or Wood Features to Allow Proper Settlement Before Planting?
Install permanent stone and timber structures before establishing nearby planting, preferably when the soil is workable rather than waterlogged or extremely dry. Allow disturbed ground and newly filled beds to settle before final planting. The appropriate waiting period depends on soil type, construction and weather, so stable levels and sound foundations matter more than a universal calendar deadline.
Excavation loosens soil, while newly placed fill contains spaces that can close after rain and consolidation. If plants are installed immediately beside an unfinished feature, their root crowns may eventually sit too low or too high relative to the surrounding surface.
Structural settlement must be distinguished from ordinary soil settlement. A correctly designed wall or arch foundation should not depend on uncontrolled movement to become stable. Visible tilting, progressive cracking or foundation displacement requires investigation rather than simply waiting longer.
For newly filled raised beds, the Royal Horticultural Society advises allowing soil to settle for a couple of weeks before planting and topping up where necessary. This is practical guidance for bed fill, not a universal settlement period for structural foundations.
To monitor disturbed soil, establish a fixed reference on a stable part of the structure and record the adjacent soil level. Check again after substantial rainfall and drying. Look for fresh gaps, depressions, heaving or unexpected changes in drainage. Persistent movement warrants further assessment before permanent planting.
Spring and autumn often offer workable conditions in UK gardens, but neither season guarantees suitable ground. Heavy clay can remain saturated after prolonged rain, while dry soil may become difficult to excavate. Check the actual ground conditions before bringing machinery onto the site or preparing foundations.
Where planting must be delayed, cover exposed soil with an appropriate mulch or temporary ground cover. Keep drainage routes open and avoid placing permanent paths over inadequately compacted fill. Temporary plants can be useful if their removal will not disturb the finished structure.
A sensible construction sequence is to establish levels and drainage, build the structural features, complete the necessary backfilling and consolidation, then prepare and plant the borders.
This sequencing is particularly valuable for raised beds, where the material forming the enclosure determines both its permanence and its interaction with the soil inside.
Timber vs Metal vs Stone: Which Raised Bed Material Lasts Longest in Wet UK Climates?
Well-constructed stone raised beds offer strong potential for long service life, while suitably protected metal beds can also provide durable, relatively low-maintenance boundaries. Timber usually demands more attention to moisture exposure and eventual replacement. However, no material has a guaranteed lifespan: drainage, construction quality, fixings and local conditions can outweigh the advantages of the material itself.
Timber provides a visually warm boundary and is often straightforward to cut and assemble. Its principal weakness is sustained moisture exposure, particularly where boards meet soil or remain wet around fixings. Adequately specified pressure-treated timber and durable hardwood heartwood can improve performance, but exposed end grain and poorly drained joints remain vulnerable.
Galvanised steel offers a thinner profile and can resist corrosion when its protective coating remains intact. The quality of the coating, fasteners and cut edges matters. Scratches and incompatible metal connections can create local corrosion risks, especially where wet soil or fertiliser residues remain in contact with the surface.
Stone offers considerable visual mass and a permanent architectural character. Its limitations include weight, construction cost and the need for suitable foundations. Poorly selected frost-sensitive stone, weak mortar or inadequate drainage can still cause damage.
The RHS advice on constructing raised beds identifies timber and masonry as practical choices while explaining the more substantial construction requirements associated with stone walls.
| Factor | Timber | Galvanised metal | Stone |
|---|---|---|---|
| Principal vulnerability | Decay at wet joints and ground contact | Corrosion at damaged coatings and connections | Frost-sensitive stone or inadequate construction |
| Installation | Relatively accessible for smaller projects | Often modular, with careful assembly required | Heavy materials and potentially skilled masonry |
| Visual character | Warm, natural and gradually weathered | Clean, thin-edged and contemporary | Substantial, traditional and permanent-looking |
| Typical priority | Initial affordability and adaptable design | Compact construction and limited routine upkeep | Architectural permanence and visual weight |
| Maintenance focus | Joints, moisture and board condition | Coatings, fasteners and corrosion points | Mortar, drainage and stone surfaces |
For edible crops, confirm that any timber preservative is appropriate for the intended gardening use. Avoid assuming that all reclaimed sleepers or unidentified treatments are safe. The RHS specifically cautions against creosote-impregnated railway sleepers in gardens.
Soil chemistry also matters. Acid-loving plants may need separation from lime-containing masonry mortar. Metal surfaces can warm quickly in sunshine, while substantial masonry can store and release heat differently; the practical effects depend on exposure, construction and the plants involved.
The best decision therefore combines budget, desired appearance, maintenance tolerance and soil conditions rather than relying on an unsupported ranking of exact service lives.
After choosing the bed enclosure, the adjacent paths deserve equal attention because their drainage behaviour influences both planting conditions and the long-term stability of hard landscaping.
Permeable Paving vs Traditional Slabs: Which Suits UK Rain Patterns and Planting Proximity?
Permeable paving is often preferable where reducing surface runoff is a priority and the underlying ground or drainage system can manage incoming water. Traditional impermeable slabs can also work well when laid to suitable falls and connected to effective drainage. The right choice depends on soil permeability, expected loads, nearby planting and the complete paving construction.
Conventional impermeable slabs shed rainfall towards joints, edges or designed outlets. If water is directed repeatedly into a narrow planting strip, the result may be erosion, saturated soil or localised pooling. Properly designed falls and drainage can prevent these problems.
Permeable paving allows water to enter through the surface or its joints and pass into a suitable sub-base. Depending on the design, that water may infiltrate the soil, be stored temporarily or drain towards a controlled outlet.
The RHS guidance on permeable front-garden paving emphasises that the underlying foundation must also support water movement. A permeable surface placed over an unsuitable impermeable construction does not deliver the same drainage benefits.
Planting proximity changes the decision. A path that concentrates runoff at a border can increase moisture beyond what some plants tolerate. Conversely, a permeable paving system does not automatically deliver water to nearby shallow roots; its drainage layers may move water away from the immediate root zone.
Use the garden’s conditions to guide the choice:
- Heavy clay: assess infiltration and whether a designed outlet or other drainage arrangement is needed.
- Small gardens: retain meaningful planting space rather than paving the entire available surface.
- High-use paths or driveways: specify the construction for the expected loads, not just its appearance.
- Frost-prone locations: prioritise suitable materials, stable bedding and drainage that limits damaging water accumulation.
- Established borders: consider root disturbance and how changes in runoff could affect existing plants.
Neither option is maintenance-free. Permeable joints and surfaces can accumulate fine sediment, leaves and organic debris that restrict water movement. Conventional paving may require joint repairs, drainage clearance and attention to settled slabs.
For front-garden paving, planning requirements can also depend on location, drainage arrangements and the applicable rules. The RHS discusses specific arrangements for England; these should not be assumed identical throughout the UK.
Even a well-drained path can become troublesome if surrounding plants, roots and soil are allowed to encroach on it. The final design decision concerns how hard and soft landscape elements meet.
Key takeaways before detailing garden boundaries
- Design the boundary around the mature size of nearby plants, not their dimensions at planting.
- Keep water, soil and organic debris from accumulating against vulnerable timber joints or paving edges.
- Provide practical access for trimming, mowing and future repairs before the garden becomes established.
How Should Hardscapes and Planted Areas Interact to Prevent Maintenance Conflicts?
Hard landscaping and planted areas work best when their boundaries are designed for plant growth, drainage and routine access. Paths need sufficient clearance, edging must control soil movement, and structural elements should avoid unnecessary contact with persistent moisture. Planning these relationships early prevents recurring problems such as lifted paving, obstructed routes and difficult mowing.
A newly planted border may appear comfortably separated from a path, yet mature perennials can eventually spread across its surface. Shrubs may obstruct access, while expanding roots can disturb shallow paving if species, spacing and construction are poorly matched.
Begin with the mature footprint of each plant. Allow space for seasonal spread and maintenance rather than positioning plants solely according to their nursery-pot size. Where larger woody plants are proposed near foundations or retaining walls, consider their root behaviour and seek appropriate specialist advice if structural risks are significant.
Edging provides a practical transition. A stone or timber border can retain loose soil and help prevent mulch from spreading onto paths. Its height should reflect the planting level and drainage arrangement rather than follow a fixed decorative rule.
A flush, stable mowing strip can allow mower wheels to travel along a lawn boundary and reduce the need for repeated hand trimming. A raised edge may hold back soil effectively but make mowing less convenient. The correct detail depends on what maintenance will actually be performed.
Access dimensions also matter. The RHS raised-bed guidance identifies a minimum pathway width of 45 cm between beds for wheelbarrow access and approximately 1 m for wheelchair access. These figures relate to the specified raised-bed context; individual gardens may require more generous space for turning, carrying materials or using equipment.
Keep leaf litter and soil from accumulating where timber meets paving or where permeable joints need to remain open. Avoid directing concentrated runoff towards vulnerable structural connections. For raised beds, ensure that maintenance access does not require repeated stepping onto planted soil.
Review boundaries as the garden matures. Plants expand, surfaces settle, and drainage routes can change. A periodic inspection after wet weather and at the end of the growing season can reveal encroachment, blocked joints or emerging movement before these become larger problems.
The goal is not to keep stone and wood completely separate from planting. Their strongest visual effect often comes from foliage softening a wall or climbing plants framing an arch. The important distinction is between controlled integration and growth that compromises access or structural condition.
Before ordering materials, sketch the garden as it appears in winter, mark the permanent structural lines, and then add mature planting footprints, drainage routes and maintenance access. This simple sequence helps ensure that stone and wood remain dependable design anchors rather than future obstacles.
Can a small garden benefit from permanent stone or wood features?
Yes. A single timber arch, low stone edge or carefully positioned raised bed can establish a clear focal point without occupying much space. In smaller gardens, choose features that serve more than one purpose, such as defining a planting boundary while providing winter structure. Avoid oversized elements that reduce useful planting or circulation space.
Does weathered grey timber need to be replaced?
Not necessarily. Surface greying can be a normal cosmetic change caused by outdoor exposure. Replacement or repair decisions should depend on structural condition, including softness, decay, weakened joints and damage around fixings. Inspect vulnerable areas near the ground carefully rather than judging the timber solely by its colour.
Should limestone garden walls be sealed against rain?
Sealing is not automatically beneficial. Stone needs an appropriate moisture-management strategy, and unsuitable coatings can trap moisture or salts and contribute to deterioration. Assess the limestone variety, wall construction, drainage and exposure before applying any treatment. For historic or sensitive masonry, specialist conservation advice is appropriate.
Can climbing plants damage a timber arch or stone wall?
Climbing plants can add seasonal interest, but their mature weight, growth habit and attachment method must suit the support. Dense growth can retain moisture against timber or make inspections difficult. Choose plants of appropriate vigour, provide suitable supports and maintain access to structural joints. Avoid allowing heavy growth to conceal developing defects.
What should be installed first when redesigning a garden?
Establish the layout, levels and drainage strategy first. Complete necessary groundworks and permanent structures before final planting, then allow newly placed soil to settle and restore its level where required. Paths, walls, arches and raised beds should be coordinated so that later construction does not damage established plants or disturb finished surfaces.